Survival horror movies and video games have introduced us to the concept of animals afflicted with diseases, mutations, etc that turn these normally quite familiar and even beloved creatures into things of purest terror. When you think of it, we surround ourselves with fluffy friends and innocent animals as pets and food sources and take them for granted on a regular basis. So, when these things suddenly become a threat it the terror is sometimes even greater than that of seeing our neighbors shambling lifelessly down the street. I wanted this in my minis games.
Once again, I turned to what I had. I had dogs and pigs, a couple of horses. I wasn't quite ready to dive into zombie horses, just yet (though I'm sure I will) but the dogs and the pigs sounded like they'd do the trick. Pigs are wicked enough as it is and the idea of them suddenly turning into flesh-craving fiends was enough to make me jump at the chance to make it happen.
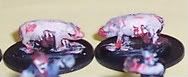
So, I had eight, skinny 15mm dogs from an old Essex minis set of Mayan Dog Handlers and three pigs from Irregular Miniatures. These would be my start. The process of converting them to horrid undead called for, in my opinion, a bit more work than simple repaints like I had done on the Peter Pig pirates. I decided that the most likely and simple place to show they were walking dead would be on their sides. Below is the quick and nasty recipe for zombie animals.
Step One
Figure out where you want to have them gored up and take your hobby knife and gouge out a few good chunks. If you are gouging the sides of the animal, make sure you keep the knife blade relatively vertical against the side of the creature and don't be too concerned with leaving vertical knife marks at the edges of the gouge (the reason for this will come later in the painting stage).
Step Two
Mix up some putty. I find that the softer putties work best for this as you are going to be working REALLY small here. Then, take the putty and push it in to the areas where you are making the gore. I formed the putty into the general shape of tears, entrails, and hanging flesh. Don't worry about being too specific in this stage. If it looks like a mangled piece of dog or pig, it's fine, just don't let it look too neat.
Step Three
After the putty has hardened all the way, prep the mini for painting like you normally would. I found that after I primed the animals, the putty work looked a lot more intrigrated into the whole minis and really came to life.
I won't go into too much detail on the painting process as everyone has their own style. I use a simple drybrush/wetbrush quick and dirty method with a few washes, afterward. The key point I'd like to make here is that you really need to look at the gore at this point. Much of it may be nondescript until you paint it up.
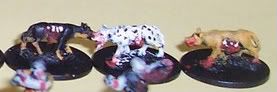
Remember those vertical knife marks? I learned that knife marks left in haste and carelessness made the perfect details to pick out with a little bone color as broken and exposed ribs. These really stand out and break up what otherwise, at this scale, looks like a bunch of red gore. Also, on one pig's face a mash of mangled putty at one side of his face was made all the more chilling by the picking out of a few spots of white to represent the still-present eyeball and teeth in the gore there. On one dog, I accomplished a nice hanging, disjointed jaw, by shaving off the existing lower jaw and repainting a hanging piece of putty with cleverly picked out teeth done in bone color.
Conclusion
I cannot street how much the painting part of this makes the animals. On every one of them, the gore bits came alive as soon as I picked out a few bony bits. Whether it was ribs, teeth, a leg bone or that milky white eyeball, the animals became truly terrible when I added those details. This could also be said for human zombies, but the figures I was using left fewer opportunities for me to do serious gore (with the exception of a few gut-hangers and limbless zombies).
Once again, I turned to what I had. I had dogs and pigs, a couple of horses. I wasn't quite ready to dive into zombie horses, just yet (though I'm sure I will) but the dogs and the pigs sounded like they'd do the trick. Pigs are wicked enough as it is and the idea of them suddenly turning into flesh-craving fiends was enough to make me jump at the chance to make it happen.
So, I had eight, skinny 15mm dogs from an old Essex minis set of Mayan Dog Handlers and three pigs from Irregular Miniatures. These would be my start. The process of converting them to horrid undead called for, in my opinion, a bit more work than simple repaints like I had done on the Peter Pig pirates. I decided that the most likely and simple place to show they were walking dead would be on their sides. Below is the quick and nasty recipe for zombie animals.

Step One
Figure out where you want to have them gored up and take your hobby knife and gouge out a few good chunks. If you are gouging the sides of the animal, make sure you keep the knife blade relatively vertical against the side of the creature and don't be too concerned with leaving vertical knife marks at the edges of the gouge (the reason for this will come later in the painting stage).
Step Two
Mix up some putty. I find that the softer putties work best for this as you are going to be working REALLY small here. Then, take the putty and push it in to the areas where you are making the gore. I formed the putty into the general shape of tears, entrails, and hanging flesh. Don't worry about being too specific in this stage. If it looks like a mangled piece of dog or pig, it's fine, just don't let it look too neat.
Step Three
After the putty has hardened all the way, prep the mini for painting like you normally would. I found that after I primed the animals, the putty work looked a lot more intrigrated into the whole minis and really came to life.
I won't go into too much detail on the painting process as everyone has their own style. I use a simple drybrush/wetbrush quick and dirty method with a few washes, afterward. The key point I'd like to make here is that you really need to look at the gore at this point. Much of it may be nondescript until you paint it up.
Remember those vertical knife marks? I learned that knife marks left in haste and carelessness made the perfect details to pick out with a little bone color as broken and exposed ribs. These really stand out and break up what otherwise, at this scale, looks like a bunch of red gore. Also, on one pig's face a mash of mangled putty at one side of his face was made all the more chilling by the picking out of a few spots of white to represent the still-present eyeball and teeth in the gore there. On one dog, I accomplished a nice hanging, disjointed jaw, by shaving off the existing lower jaw and repainting a hanging piece of putty with cleverly picked out teeth done in bone color.

Conclusion
I cannot street how much the painting part of this makes the animals. On every one of them, the gore bits came alive as soon as I picked out a few bony bits. Whether it was ribs, teeth, a leg bone or that milky white eyeball, the animals became truly terrible when I added those details. This could also be said for human zombies, but the figures I was using left fewer opportunities for me to do serious gore (with the exception of a few gut-hangers and limbless zombies).