
I had a chance to do some more work on this project over the last few days. I started by taking a second look at the overall profile of the piece and deciding that I didn't like how absolutely vertical it looked. Although I know that rock formations can shoot up pretty steeply from the ground, this just didn't look right on this piece. So, I decided I needed to widen it out and expand the horizontal dimensions of the piece.
I started by cutting a larger oblong base out of one of my favorite construction materials - pizza box cardboard. This was cut to a pretty much organic shape that worked around the existing piece and left room for it to grow on one side.
I started by cutting a larger oblong base out of one of my favorite construction materials - pizza box cardboard. This was cut to a pretty much organic shape that worked around the existing piece and left room for it to grow on one side.


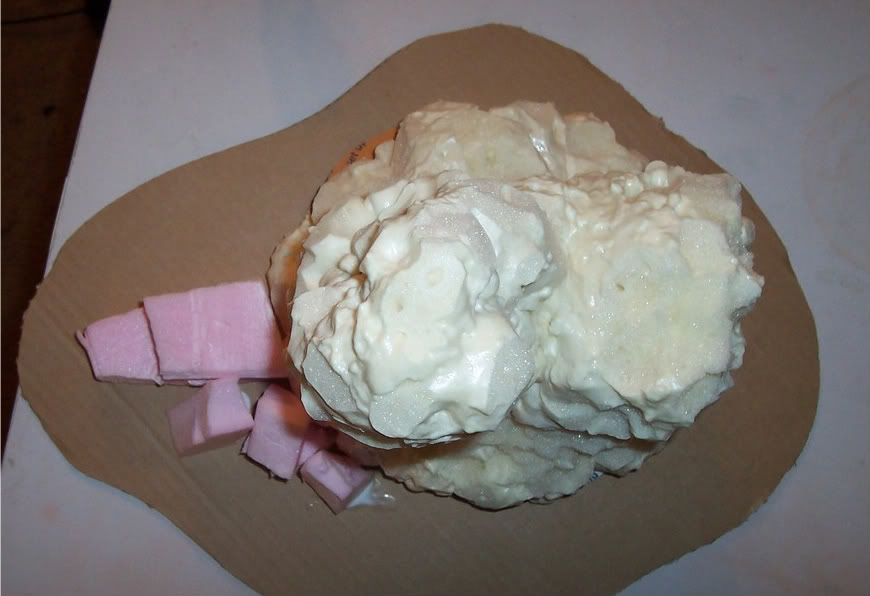
I then positioned the piece on the new base, deciding that the tallest spire, the one that also leaned at the oddest angle, needed to be on the balancing side of the expansion. Glueing it down to the cardboard I then broke off a few chunks of loose pink styrofoam insulation board and glued them into a formation at the base of the tall spire. These would form the foundation for the application of a little more expanding foam.
Once the main piece and the expansion foundation had all dried into place, it was time for a light dosing of expanding foam to bring it together. I sprayed a bit into the major gaps between the existing structure and the new pieces. I also noticed that some gaps had formed along one side of the main structure and so decided to apply a small amount of the expanding foam along those places as well.
One thing I did do this time around was use small, controlled applications of the foam which I then patted and smeared into lower profile coverage (wear gloves!). This had an added bonus of creation a lot of small little bumps that look a lot like a scattering of weathered boulders and rocks. This will go a long way to make the piece seem more "natural".


The next step is to do some more shaping on the new foam sections and then to spackle the whole thing to get it ready for painting.
More later,
-Eli
[Note: Ignore the dates on the photos. I didn't realize until after taking the pics that the date was set so horribly wrong on my camera. This really is a new project]


I like it. It resembles a giant travertine, fresh water limestone, deposit. You can see what I mean at the following link.
ReplyDeletehttp://www.desktopscenes.com/Scenes%20from%20Yellowstone%20(2003)/slides/Fragile%20Travertine.html
These deposits along with geyserite can be very big.
Hey thanks for the link. Looks cool. Too bad that stuff is fragile. I doubt it would make a good habitat.
ReplyDeleteI had been thinking that some sort of limestone might make a good way to go. The bumpy, chunky shape seems to suggest larger, harder stone strapped in some sort of other matrix or stone.
Ok I'm a geologist so forgive the nerd mode here.
ReplyDeleteTravertine is fragile because it is deposited at fairly low temperatures and contains mostly calcium carbonate; limestone.
Geyserite is harder because of the higher deposition temperature, which means it contains not only calcium carbonate but dissolved silca, quartz, as well.
So you could call it an old geyser formation as they do get big and can be preserved in a verticle formation like you have.
Additionally black smokers have a similar depositon pattern. Check out the following website for some information and pictures about them. Ancient black smokers are found on dry land today.
http://www.geo.uni-bremen.de/Ozeankruste/main_e.htm
Just to provide further inspiration for you. ;)
ReplyDeletehttp://picasaweb.google.com/saragovero1/TheLGlacierNPToYellowstoneNPToBadlandsNPSaraGovero#5247432656844223138
Excellent. Thanks for the inspiration there. I did a bit of cutting and trimming on the expansion last night. It's a little less round, but should still look great on the table.
ReplyDeleteMy wife thinks you have a 'Devils Tower' fixation going on there. LOl!
ReplyDeleteNext it will be with mashed potato....
Seriously, great stuff!
Cheers
Mark
LOL! Lovely!
ReplyDeleteThis project has got me thinking of some 15mm sci-fi projects as well.