DEPARTMENTS

Showing posts with label Terrain. Show all posts

Thursday, January 21, 2016

Jungle-engulfed Car

Hey folks,

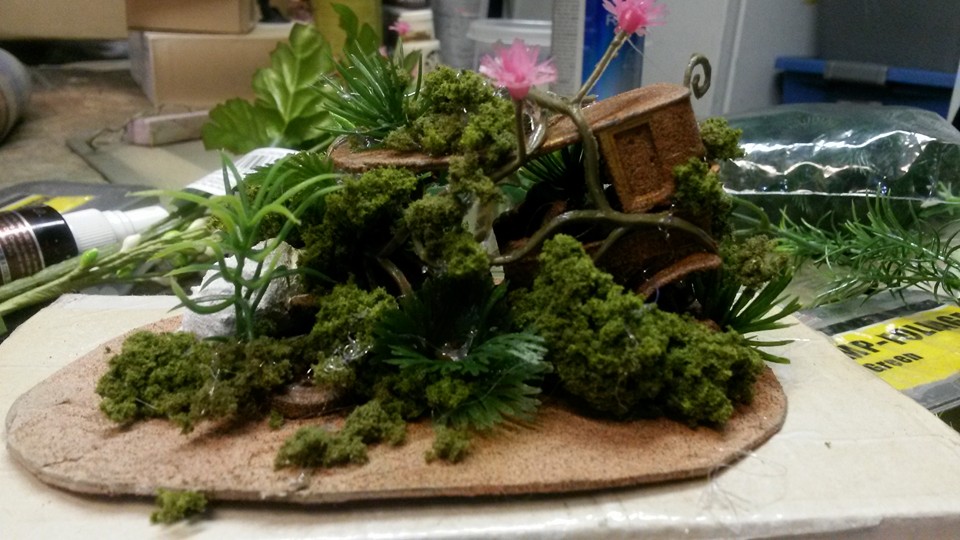
I wanted to show off my nearly finished with my jungle overgrown car.


This was made from a used die cast car that had no rubber on its wheels. A bit of hammering bent it out of shape and a base coating of textured rusty red paint made I took old and junked. Various decorative plants and modelling foliage buried in the thick of the jungle.

The two sides are very different with the right side of the vehicle being much more open than the left. This will allow figures to use it for cover and for objective markers to be placed inside.
The addition of the colorful jungle flowers to the protruding vines was both an expedient way go tame some uncooperative parts and add extra character to the piece. The flowers themselves could be an objective.

Monday, July 20, 2015

Building my New 4 x 4 Gaming Board


I have been in need of a proper 4 x 4 gaming board for some time now. While there is nothing wrong with a roll away mat and my dining room table, I wanted something a bit more durable and larger for use with 15mm scifi games. So, I figured it was high time to make one.

I already had the perfect 4 x 4 plywood off-cut laying around from another project and that would make the perfect start. The rest of the materials were things I had laying around as well from other hobby projects, so not a single new thing was bought for this project.

The first step was to lay on a good coat of Deck Restore. I like the 10X stuff because it tends to stay where I put it and provides a good solid coating which works well for adding to terrain projects. I should also note that Deck Restore does come in colors but I had the clear stuff on hand.
I was rather unceremonious about the application of the Deck Restore and started by pouring out a good amount of the can into the middle of the board. I then spread this around, changing direction a lot so as to minimize patterns in the stuff.

The final step in the application was to come back after about 20 minutes, with the material having set a bit and then distressing it some more for the look I wanted. Don't be too worried about texture after you apply it. Gravity will smooth a lot of those.


After the Deck Restore dries and hardens (24 hrs unless you leave it out in the summer heat), I went over it with a brush of a basic sandy color that I picked up at Home Depot in their paint department. I should note that this wasn't painted on but was still wetter than a dry brush. I more fanned a semi-loaded brush over the surface to catch most of the details.

Just as an aside, I cruise the paint department for mismatched or returned sample jars that they sell off for a pittance. It's easy to build up a collection of handy colors this way.

Once the base color was dry enough, I then went around adding some irregular splotches of other color by spraying on several colors of spray paint. I used tans and even a light olive color. The idea here is to break up the monotony of the tan base.


The final step was to stain the whole thing and bring it all together. I chose a Honey Cherry stain. A small 0.5 liter can was enough for the whole board. Again, not a lot of care was taken in the application here. I poured the entire can into the general area of the middle of the can, making an irregular pool. The only care I took here was to keep the precious color on the board.

After the can was empty, I then took my brush and pushed the stain out for the middle, making sure that ever part of the board got some and that too much wasn't pooling in any one place. This produced a nice irregular orange-ish sand coloration that looks quite nice. 


The end result is a durable and lushly colored earth tone and textured board. While it makes for a desert board easily enough, the color is neutral enough to really work for most ground types. Adding foliage will make it seem less barren and structures added could make it look like lived on ground.

-Eli

Sunday, February 23, 2014

Oopse Paint

I'm sure this is nothing new but I figured I would share for the sake of those who may not have discovered the wellspring of cheap project paint. I am always on the lookout for the inexpensive sources of paint, especially for the purposes of base coating large areas such as in the case of terrain projects. I have found that the local DIY stores are a great source for this.


Many of them have a rack, nestled, not always so visibly, next to their paint counter. This is where they keep what my wife called the "oopse paint". Oopse paint is that stuff that was mixed and not the right shade or mixed wrong or whatever else can befall the masters of paint alchemy. The bottom line is that you can get some good shades at about $0.50 per 7 ounces. The pic in this post shows my latest acquisition which was a collection earthy greens and sandy tones. Even if you can't find the colors you need, I find this is a good way to get some good, but cheap paint that you can slop onto a piece of styro terrain that you need to seal up.

Check it out!

-Eli

Wednesday, January 8, 2014

Where I am Going


The sketch above shows a rough potential layout for all of the scratchbuild terrain in the works. If I can get this all done I'll have quite the settlement.

-Eli

Tuesday, January 7, 2014

I Cannot Lie....

I like building Terrain


Here are some pics of the landing pad I am working on.

This is another junk build. As you can see it is based on an old board game board. These make excellent alternatives to MDF. The platform itself is a cake stand, purchased at a local craft store. I used my mototool to grind off the logos and lettering, making sure to add in some added distress with the grinder to make sure it looked like damage from use and not where i ground the lettering off.


The risers are made from plastic hair curlers, slipped inside small prescription pill bottles. The central base is a plastic jar for some product.


Here you can see the landing pad after I started adding some of the associated structures. A storage tank on the left is a vitamin bottle resting on a paper gift box purchased at the craft store. The structure in the fore ground is a drink mix container. We have a lot of these around the house and I have used them for making improvised habitats. This one is a crude tool shed, workshop used by the colony's maintenance crews. The boxy structure on the right is another paper box from the craft store and will have resin windows and doors added. This will likely be marked as a sort of security station or something.


I even added some graffiti. Even a space colony has to have a hangout.


Wednesday, January 1, 2014

With the Rest of the Garbage...

Space Terrain for X-Wing


A buddy of mine got the X-Wing Miniatures Game and a bunch of ships for it. While I do not have any ships for it, this gave me a perfect opportunity to scratch build and sculpt some cool terrain for the game.

Using chunks of styro, plastic card and various bits, I put together two good sized pieces of space debris that could be used as chunks of space wreckage from a battle or stuff jettisoned before making the jump to light speed. I glued it all together with a combination of super glue for plastic on plastic and hot glue when I needed to secure pieces to the styro directly.


I based coated each in a sloppy, heavy coat of black paint. This was supposed to be space junk, so a little rough finish wasn't going to hurt anything. Once this had dried, I went back over everything with a hasty stippling of grey, making sure to try to leave some of the black showing through, especially in the deeper recesses and between the plates and creases. After the grey had dried, I went and added some color, stippling on red and a very pale tan (almost off white) color to color whole plates, leaving some of the grey and black showing through. I also added some red to random section and along some of the linear shapes. I painted a few stripes and some characters on some panels.


The final steps were to give the whole thing a rather haphazard drybrushing of the same off white focusing on the edges and a light dusting across the flat surfaces to show wear. Each of the two pieces then got a splotching and splattering of Army Painter Strong Wash to add grime. This I tried to lay on a bit thicker in the deeper parts and where many pieces collected. It helped to show where grease and space grit had collected and hid some of the heavier glue joins in those areas.

The other project was this guy!

As a bit of Star Wars accent terrain, I thought it would be fun to make an asteroid out of which was popping a hungry, juvenile Giant Space Slug. While not big enough to swallow a Millennium Falcon, it could still menace smaller fighters and just looked cool.


Sculpted from epoxy on a wire armature, i tackled this like any sculpting project. The main body and head were done as a single piece with the details of the upper teeth sculpted as part of the main body. the lower jaw was sculpted as a separate piece and then joined to the rest of the piece with more sculpted putty. A little shaving and some more putty work brought the final head shape together. The last part of the build was the eye stocks which were just bits of wire pressed into the side of the head with a little putty added to shape and texture them.

I should note that the tapering at the bottom of the sculpt is intentional and ends in a centimeter of exposed wire. This allowed me to press the sculpt into the hole in the asteroid he would be popping out of. Once I had pressed a fitting anchor hole in and was sure that the only parts showing were the fully sculpted bits, I set the mini aside. 


The asteroid was shaped from a block of blue styro. The basic texture was carved out with a blade and my thumb nail. I then applied several blobs of superglue all over the thing and spritzed them with accelerator. The resulting chemical reaction created some nice textural effect. After this had settled down, I sprayed the entire thing with rattle can black paint, knowing that this would result in further texturing caused by the break down of the foam. The final piece was then given a thick coat of brushed on black, over which I did a quick wetbrushing of brown. I then painted the whole rock with Army Painter Strong Tone dip. This is different than the small bottle stuff used for shading miniatures and is a full-on lacquer and sealer which I needed for this anyhow. I highlighted the whole thing with a much lighter brown.

Once the paint had dried, a little hot glue was squirted into the hole for the beast and he was pressed in, making sure that all that showed was his pale monstrous form.

I hope these add a bit of fun to my friend's games,

-Eli
Friday, December 6, 2013

Alien Terrain - Ghost Trees

A while back I started working on these but time and inspiration had abandoned me. Recently I got back to them and started working them toward finished. I'm not there yet, but I thought I'd show where I am going with these.


The end result I am after is something haunting and gaunt, hinting at and ancient life form. I am calling these "Ghost Trees" and they are in many ways the silent ghosts of an ancient ocean that no longer exists. What you are seeing here is the petrified remains of some coral like structure.


I built these anchored an looming over a dunw-like ridge. The final colors will be a dirty mix of calcified whites with bits of color peaking out. The colored one in the pictures is what they looked like after a brown wash over the back white color. I'll go over them with a drybrushing of white again and then some very watered down pinks and oranges.

Friday, September 27, 2013

More Animal Tank Decoration Finds

Hey all,

Recently I've spent a lot of time at the local pet shops. The kids have some new pets and here has been a never-ending need for supplies that can only really be found there. The good news is that this has allowed me to spend a lot of time looking at the shelves covered in various animal tank decorations. I say animal tank and not just fish because some of the best ones were found in the aisle for reptiles.


The images here, show the pieces as they came off the shelf. I have applied no weathering, shading or highlighting. The pieces in the top picture almost seem purpose made for miniatures (who knew lizards were 28mm). The piece on the right could make a nice caveman home or monster lair. The one center above has a lot going on, including some walk around space above the cave opening. The item on the left seems to be the sort of place where a star captain might fight an alien commander. The rock formation below make a nice natural gateway or even a bridge. As a bridge it might be a bit of a challenge going up the steeper side but that's all part of the fun.


While I still enjoy making my own terrain, I am finding that these pieces provide a ready supply of terrain that is quick to get to the table. The paint jobs are effective, the materials, resilient and the prices are really not all that bad compared to some of what we are asked to pay for purpose made, pre-painted terrain.

Thanks and as always, have fun!

-Eli

Monday, September 2, 2013

Recent Discoveries From Faraway Lands

Amazing discoveries brought to us by intrepid adventurers to faraway lands!

So, recently I managed to make a few new additions to the old Pulp collection. These are two pieces that I have really been looking to grab for a long time.

The first is the amazing Allosaurus from Papo. To call this a toy almost seems insulting as the level of detail in the sculpt and paint job are as good as many gaming models out there. The picture shows the dino in the stock paint job right off the shelf. It stands easily on its own two feet and has an articulated jaw.


While the listing in any catalog makes this thing seem huge (11") it really doesn't end up too huge at all and is a respectable size for any Pulp genre monstrosity. The figures on the table with it are 28mm Artizan and Copplestone miniatures.


The other new item is a wonderfully painted and sculpted animal tank decoration. This great, ruined head seems just perfect for adventure in exotic lands and, except for the flat brown color inside the break, seems to need no further painting to use it on the table. The piece is sculpted all around with a walled surface in the back.


While these models aren't the sorts of things to appear in every Pulp Alley game I run, they are definitely fine accents that will spice up more exotic adventures.

-Eli

Friday, April 26, 2013

What a Piece of Junk!

Yes, indeed it is!


This little bit of accent drop-terrain is a combination of bits and pieces of balsa, brass tubing, model kits parts and even some metal hardware fittings all piled over a broken up Clix robot. All together they forms a nice heap of garbage that can be added to any layout to enhance the feel and provide some tactical details like cover and obstacles.

This is a super easy bit of terrain to do and you can do a bunch of them and they can add so much character to a battlefield.

-Eli

Tuesday, April 23, 2013

Junk Building - Start to Finish

This is for Mike who asked if i could show some of the earlier stages of one of the builds. I don't have any new ones in the works, but I have taken pics along the way on one of the current finished ones.


Phase One- All kinds of junk and bits.


Phase Two - Surface and base coat. 


Phase Three - All done!


The Next Piece = More Science Fiction Industrial Terrain


Howdy all,

So I had a change to put the finishing grime on another piece of my industrial terrain. Like the first piece I showed, this is made mostly of found item with one or two part specifically purchased for use as terrain. Included in this design are pill boxes, food containers, an electrical box, parts from various medical equipment and containers. There is also a drinking straw and some ladders and steps from architectural modelling components. This project includes no doors or other fittings from GZG in this project.


I also decided to show a glimpse of some of the other projects on my work table. Shown below are some other structure that will be gracing my scifi colonies.


Monday, April 22, 2013

Finally Finished Sections of 15mm Scifi Terrain!


Howdy all,

I have been at this one awhile. I kept coming back to it, trying to figure out how to make it look right. So, after a few trials and errors, I think I'm happy with it. 

This terrain piece is a pretty straight forward industrial structure that could used as a shop or garage. Like many of my "tiled" terrain pieces, I left a good portion of this one empty so that I could customize it to my needs by adding various drop in features or just leaving it open for the sake of creating open fields of fire that would need to be crossed.

There are a lot of junk bits in here including printer cartridges, pill bottle caps, packaging, and a candy container. There are also bits of Plastruct architectural materials (tubes, plasticard and ladders), GZG pre-made bits, and even a few Flames of War bases. 


The Yard


The front door and garage entrance


Side showing gas storage tank and side of ventilation block


Friday, March 1, 2013

Great Blog For Easy Terrain Ideas - Terrain for Hippos

I discovered this blog on a random search for 15mm science fiction terrain and found it to be an amazing resource for some simple terrain products that are very nicely laid out and hosted by a most personable cartoon hippo.

Terrain For Hippos

Check it out and give it a look!

-Eli

Saturday, February 23, 2013

A New Weapon In The Battle On Terrain

Wagner Spray Tech 417005 HVLP Control Sprayer, 4 PSI

Would you like to know more?
While most guys would likely already have bought one of these for home projects, I have never felt the need to do so until I began working with large pieces of terrain built from styrofoam. After many attempts to find alternate means to cover large areas in an efficient way and to get into the nooks and crannies, I finally caved and started looking for a power sprayer that could apply regular acrylic paint.

The answer was the toy shown above. At the price of around $50 it was an acceptable price to pay for a hobby tool. If I were intending it for heavier duty work, I'd likely have gone with something more robust but for the occasional hobby project, this fits fine with it's built in motor and ability to plug into an outlet (no power packs or batteries) it is simple and no nonsense.

I took it out for a test run and it worked fine covering 18" x 12" section of terrain with a large vertical build-up in no time. Several follow-up passes were needed from various angles to get into all the cracks on the detailed rock face, but still it took less time than the gesso, less work than a hand brush, and no risk to the build than one would get with pre-coat and subsequent spray paint (always seems to be some area you missed).

-Eli

Wednesday, February 20, 2013

Rock Terrain Madness (Part Four) - Flocking


The first few of the rocks are done. I can now show them off in all their rocky, flocked glory. Flocking was done simply enough with a bottle of super glue and my flocking bucket. I was able to "draw" on the rocks with the glue and strategically place flocking where it looked good and made sense.


The fun, two-piece rock came out quite nice with a good amount of flocking in the gully between the two spires. This gave it a nice realistic look as one can imagine that little cravass being quite moist a lot of the time and collecting all sorts of this and that. 


Without a flash, the gap between the two spires actually actually looks a little forboding. Who knows what is lurking around in those shadows?


The vertical spires were very fun to flock. Figuring out where the seeds and moisture would collect was a bit of science and art all at the same time.


As you can see here the effect is quite nice and natural without the flash (image right). You can see where the drizzling rains have accumulated making a nice green shelf.
Related Posts Plugin for WordPress, Blogger...